|
[ Trading Spaces | Designer
showcases ]
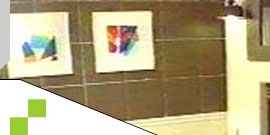
New Jersey: Lincroft RdDescription: "Country Kalaidescope" family room (TLC episode page) How ToRusty Wheel
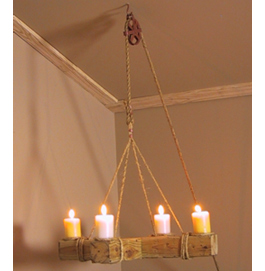
From an article Doug wrote for Paint Ideas:
I designed an aged hanging wood and rope chandelier which needed to be lowered for lighting of the candles. In order to do this, I chose a large pulley wheel typical of use in barns and farms. Unfortunately the pulley wheel is new silver metal and I need it to look old.
- Pulley wheel or other new metal that you need to look aged
- Drop cloth
- 1 American Accents Natural Rust Decorative Finishing Kit
Included in the kit:
- Spray-on base coat
- Brush-on top coat
- Gloves
- Foam brush
- Idea booklet
- Working in a well-ventilated area, spray on base coat to your item of choice whether it is a door knob or picture frame. I find that items having cracks and crevices, which will become enhanced by this process, are best.
- Without delay brush on top coat with provided foam brush.
- Blot off top coat with your material of choice. I used a paper towel for my pulley. Different effects can be used to achieve variations. Try a plastic bag or household kitchen sponge. Be creative! Have Fun!
Bring the charm and texture of weathered metal to any household item. Indoor or outdoor the natural beauty of rust is easy to achieve in these three easy steps.
Country Table
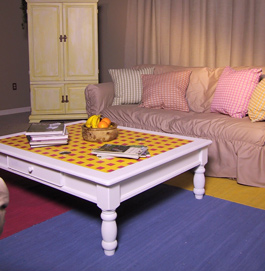
From an article Doug wrote for Paint Ideas:
- Wood coffee table
- Drop cloth or old sheets
- Sandpaper
- Tack cloth
- Medium and small paint brushes
- Easy release painter's tape
- 1 quart Painter's Touch Primer (optional)
- 1 quart Painter's Touch Gloss White paint
- 1 half pint Painter's Touch Sun Yellow paint
- 1 half pint American Accents Raspberry Red paint
- Choose your table of choice to create your country craft coffee table. You can start with a painted or unpainted table, but make sure that the top surface is without carving detail.
- Lightly sand the entire piece and wipe clean with a tack cloth.
- If table is unfinished wood or if the original paint was a dark color, prime all surfaces with Painter's Touch Primer following application directions on the can.
- Choose the color you want the legs and perimeter top of the table to be painted. I used two coats of Painter's Touch Gloss White.
- When base is completely dry, tape off a large square in the center of the table with easy release tape (making sure the area is measured to the exact inch for even squares) to leave a boarder of white when the tape is removed.
- Paint large taped-off square section with the lighter of the two colors you've chosen to create the square pattern. Two coats will be required. I chose Painter's Touch Sun Yellow.
- Start laying down one inch rows of easy release tape. Work from one end to the other making sure to seal the tape by rubbing your hands over it.
- Leave the first row of tape you just put down and remove every other row.
- Repeat steps 7 & 8 going in the other direction so that the tape crosses over the first set of tape lines you applied.
- Make sure all tape is secured tightly to the surface so that there is no color bleeding. Brush on two coats of the contrasting chosen color. I choose American Accents Raspberry Red.
- Remove tape and enjoy your new custom designed table. Be creative with your paint choices the possibilities are endless!! Have Fun!!
Because you're working with tape and multiple coats of paint, be sure to follow the re-coat and dry times on the cans of paint you use.
|